Llámanos
(813) 440-8108

Installing a UV (ultraviolet) light in your HVAC system is a great way to improve indoor air quality by eliminating mold, bacteria, and other airborne contaminants. These lights help keep your HVAC components clean, boost system efficiency, and reduce allergens in your home..
In this guide, we’ll walk you through everything you need to know about installing a UV light in your HVAC system, including the benefits, where to place it, and how to do the installation safely.
UV lights work by neutralizing mold, bacteria, and viruses that grow inside your HVAC system or circulate through the air. Here’s why adding one to your system is a good idea:
- Improves Indoor Air Quality – Kills bacteria, viruses, and mold spores before they reach your living space.
- Prevents Mold Growth – Stops mold and mildew from forming on your evaporator coil, which is a common issue in humid climates.
- Reduces Odors – Eliminates musty or stale smells caused by bacteria buildup in your ducts.
- Boosts HVAC Efficiency – Keeps your system cleaner, improving airflow and reducing strain on your blower motor.
👉🏻 What Is the Ideal Static Pressure in HVAC Systems?
Before installing a UV light, it's important to choose the right type for your needs:
Installed near the evaporator coil (inside the air handler).
Prevents mold and bacteria growth on the coil.
Best for homes in humid climates where moisture buildup is common.
Installed inside the return air duct to treat air as it circulates.
Kills airborne bacteria, viruses, and allergens.
Ideal for improving whole-house air quality.
If your main goal is preventing mold inside your HVAC system, a coil sterilization UV light is the better choice. If you want to purify the air throughout your home, go for an air sterilization UV light.
Motor remanufacturado por United HVAC Motors
Garantía de reemplazo de 2 años (se aplican términos)
Plug n Play - 100% programado...
Motor remanufacturado por United HVAC Motors
Garantía de reemplazo de 2 años (se aplican términos)
Plug n Play - 100% programado...
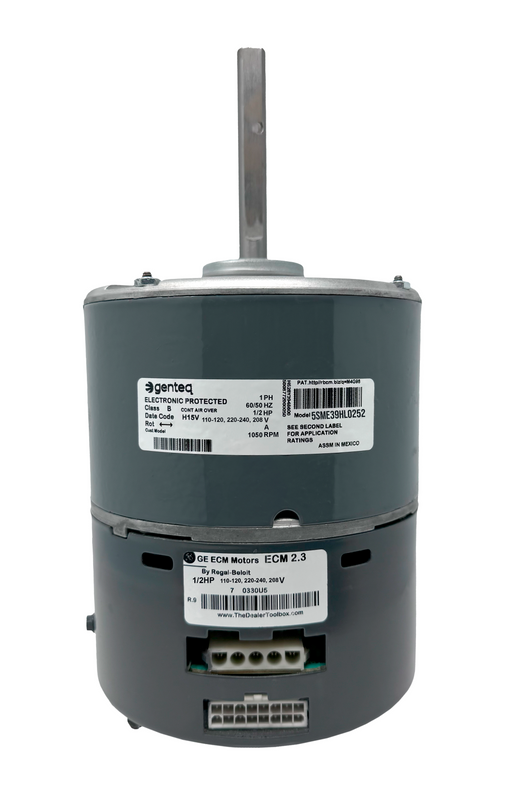
Motor de soplador Genteq 5SME39HL0252 ECM 2,3 1/2 HP
Precio original
$699.99
-
Precio original
$699.99
Precio original
$699.99
$699.99
-
$699.99
Precio actual
$699.99
En stock
Precio original
$699.99
-
Precio original
$699.99
Precio original
$699.99
$699.99
-
$699.99
Precio actual
$699.99
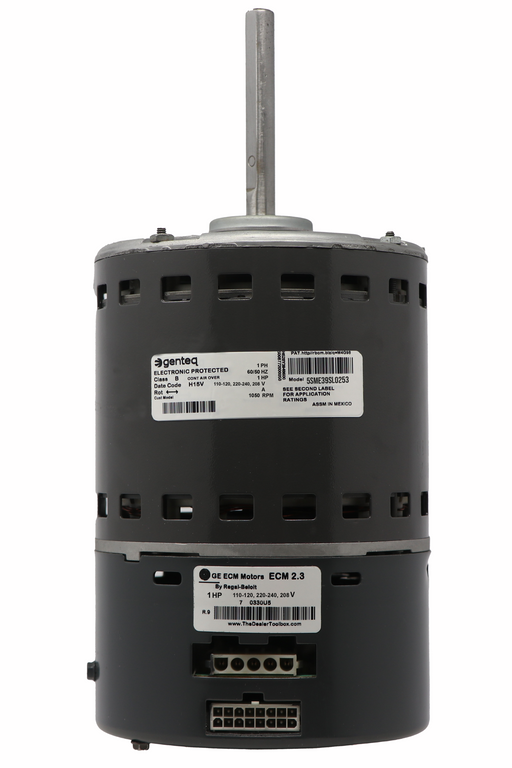
Genteq 5SME39SL0253 Motor de soplador ECM 2.3 1 HP
Precio original
$699.99
-
Precio original
$699.99
Precio original
$699.99
$699.99
-
$699.99
Precio actual
$699.99
En stock
Precio original
$699.99
-
Precio original
$699.99
Precio original
$699.99
$699.99
-
$699.99
Precio actual
$699.99

Before getting started, turn off your HVAC system at the breaker to avoid electrical hazards. Also, wear UV-protective eyewear when handling the light—it can damage your eyes if exposed directly.
If you’re installing a coil sterilization UV light, place it inside the air handler, close to the evaporator coil.
If you’re installing an air sterilization UV light, mount it inside the return air duct before the HVAC unit.
You’ll need:
Most UV light kits come with a template to mark where to drill. Follow these steps:
Hold the template against the ductwork or air handler.
Use a marker to outline where the hole will be.
Drill the hole carefully, making sure it fits the UV lamp.
Insert the UV lamp through the hole.
Secure it with the mounting screws or bracket included in your kit.
Attach the ballast (power supply) to the HVAC unit using screws or adhesive tape.
Most UV lights plug into a 120V or 240V outlet, while others hardwire into the HVAC system.
If hardwiring, follow the manufacturer’s instructions or hire a licensed HVAC technician to do the wiring.
Turn the HVAC system back on.
Switch on the UV light and check if it glows (most lights emit a faint blue glow).
Make sure the ballast is securely mounted and the wiring is tucked away safely.
That’s it! Your UV light is now installed and actively purifying your HVAC system.
👉🏻 Which Type of Plan Shows the Layout of the HVAC System?
UV lights are low-maintenance, but they don’t last forever. Follow these tips to keep yours working effectively:
✔ Replace the UV bulb every 12–24 months (even if it still glows—its effectiveness weakens over time).
✔ Clean the bulb every 3–6 months with alcohol wipes to remove dust buildup.
✔ Check the ballast and wiring annually for any loose connections or signs of wear.
Installing a UV light in your HVAC system is a simple upgrade that can make a big difference in air quality, system efficiency, and mold prevention. Whether you choose a coil sterilization light or an air sterilization light, the installation process is straightforward and can be completed in under an hour.
However, a UV light alone won’t fix airflow problems if your HVAC components, like the blower motor, aren’t functioning properly. If your system isn’t performing at its best, upgrading to a remanufactured blower motor with an extended warranty is a smart, cost-effective solution. Browse our selection of high-quality blower motors here.
If you’re not comfortable handling electrical components, hire an HVAC technician to install the UV light for you. A professional installation ensures the best placement and wiring for maximum effectiveness.
Motor remanufacturado por United HVAC Motors Garantía de reemplazo de 2 años (se aplican términos) Plug n Play - 100% programado...
Ver todos los detallesMotor remanufacturado por United HVAC Motors Garantía de reemplazo de 2 años (se aplican términos) Plug n Play - 100% programado...
Ver todos los detalles